Enigmatic and gigantic, 173 stone faces adorn the remaining 37 towers on the upper-level cruciform platform. Why are they there, and whose face is it?
By Rick’s Café Noir – 19 October 2025
The Bayon Temple is probably the most popular temple visited by tourists in Cambodia’s Angkor Archaeological Park, after Angkor Wat. Located in the exact centre of the ancient city of Angkor Thom, visitors are drawn to the Bayon for its enigmatic, giant stone faces, and its extensive bas-relief carvings. First impressions of the Bayon, though, are not as awe-inspiring as the first glimpses of Angkor Wat.
Click on the links below to jump to:
- First Impressions
- Bayon History
- Whose Face is it?
- Best Times to Visit
- Golden Hour
- Shooting the Faces
- Access to the Upper Level
- Last Thoughts
- Camera Gear
First Impressions
When you first visit the Bayon Temple, after passing through the South Gate of Angkor Thom and heading north, your first view of the Bayon is a big pile of grey stones surrounded by forest.
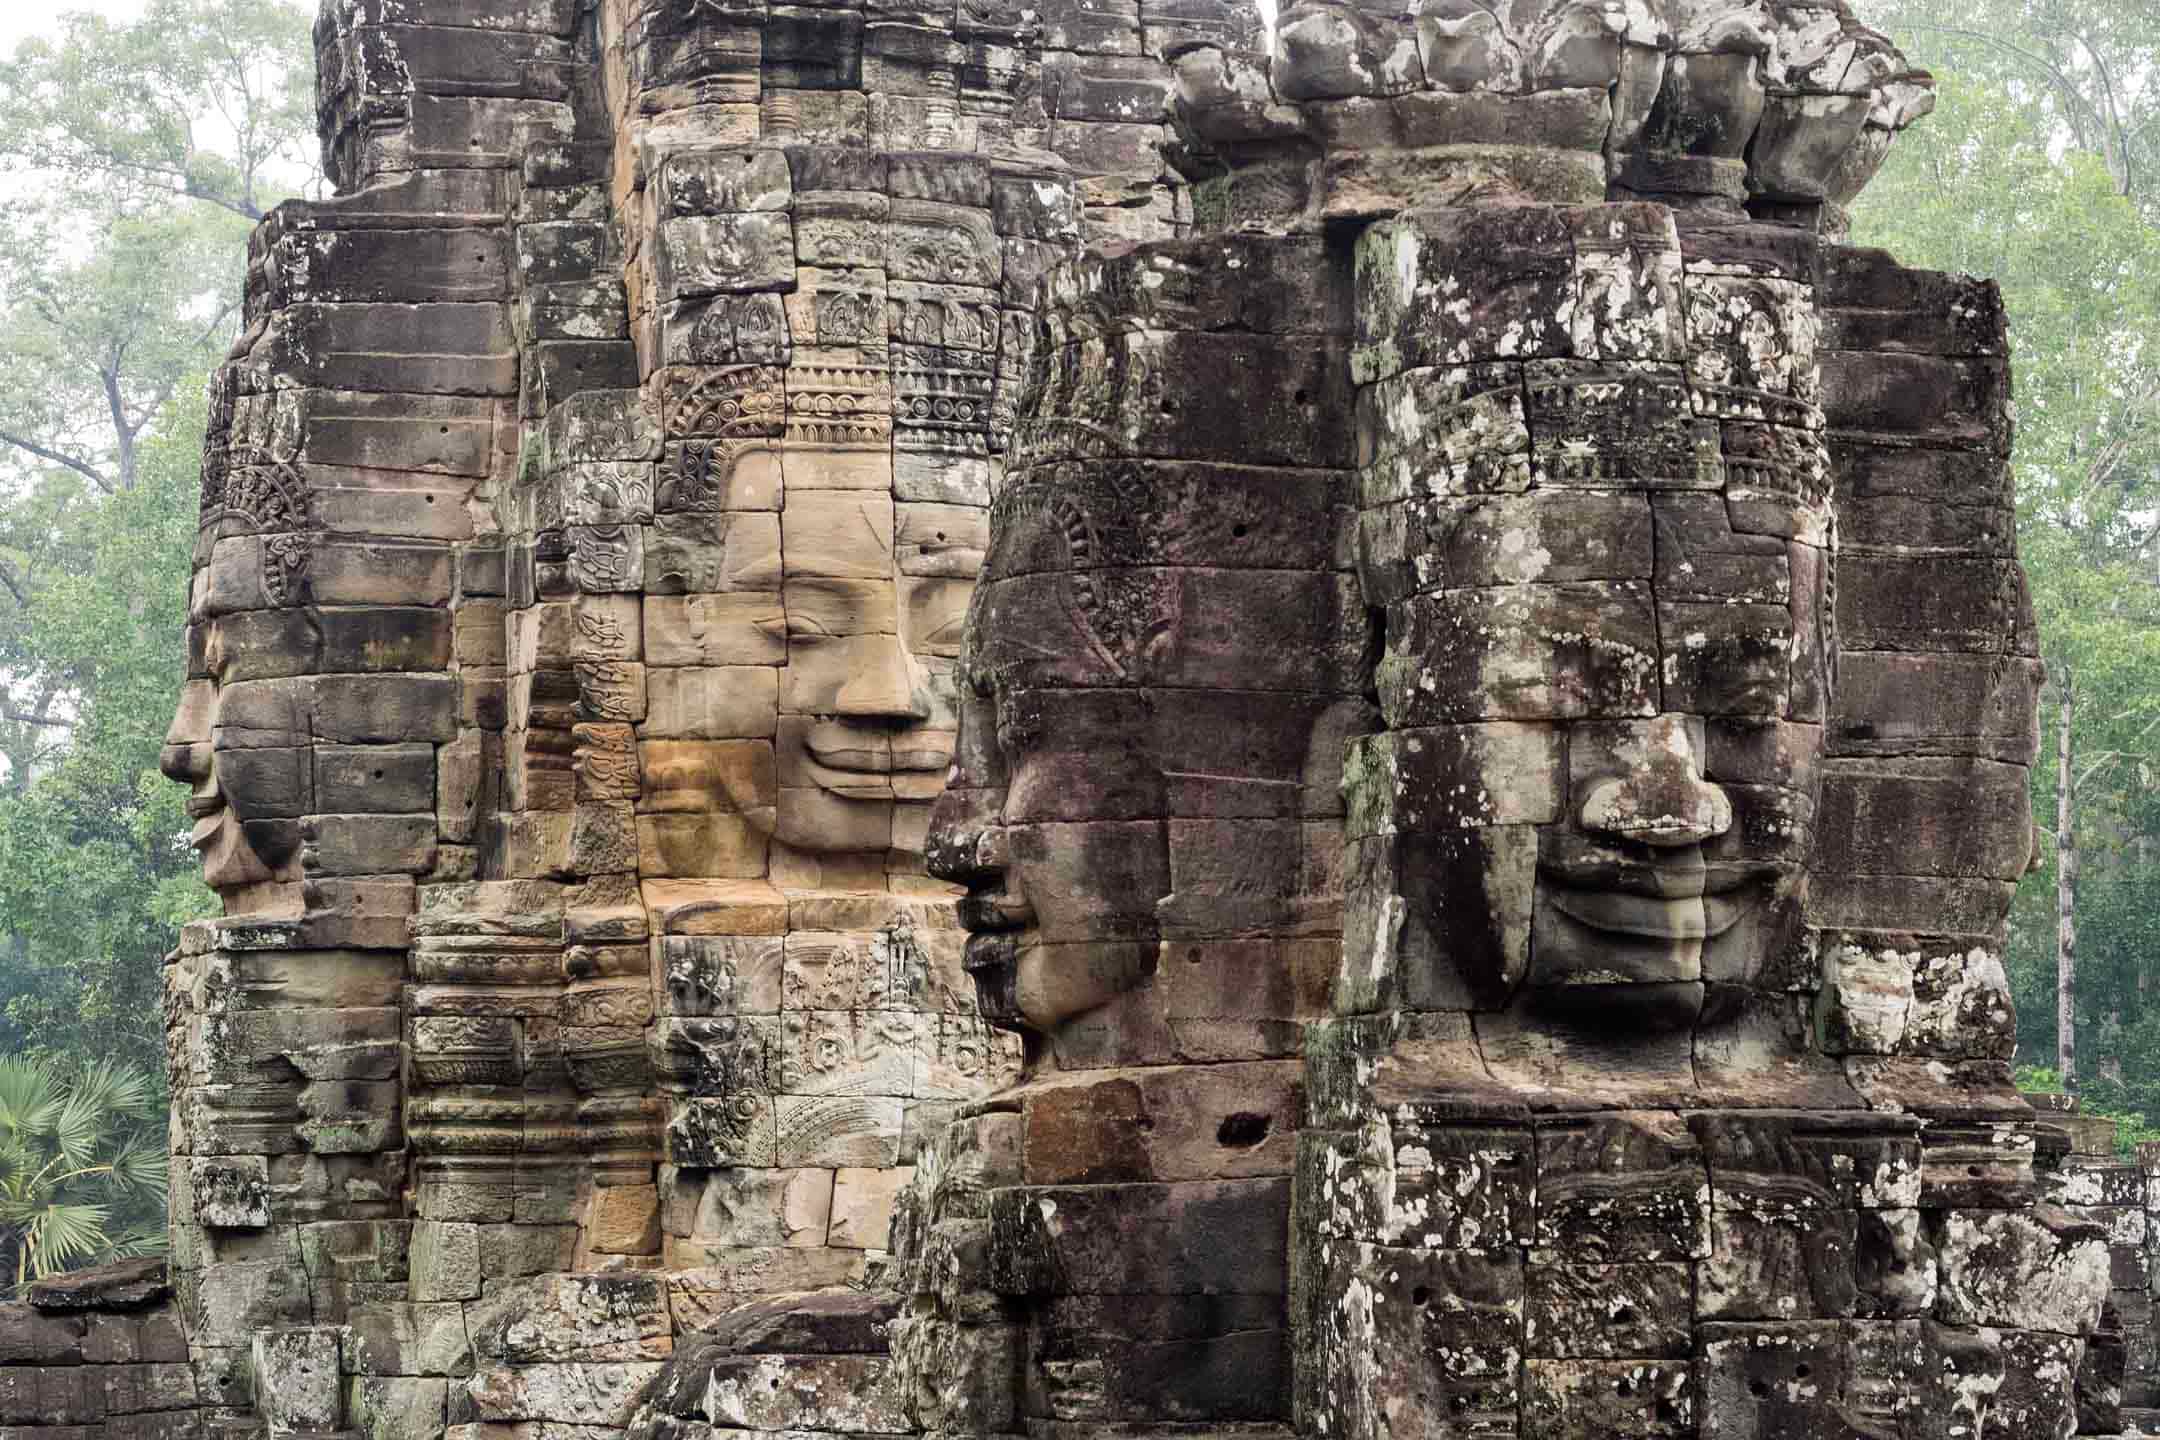
As you get closer you can discern the giant faces on the towers of the upper level, and once you arrive, the faces are everywhere you look. The image below is what you see when you get close. It looks like a big jumble of stones, but there are actually ten faces visible in that image, if you look closely.

©2025 Rick Piper Photography. View a hi-res version of this image at rpphotoz.com
On the eastern side of the temple there are two large basins, or ponds, one each on either side of the elevated naga-lined terrace leading to the east gopura, and if you want to get a shot of the temple towers reflected in the water you need to visit either during, or at end of, the rainy season. I have only been to the Bayon in December and January, and most times the basins have been completely dry, or just very small ponds. So, if you want to see the temple reflected in water, try to visit at the end of the rainy season – November, when it may or may not still be raining, rather than December or January.
Note that the restoration work on the upper level, to repair and make safe the naga balustrades to the edge of the southwestern part of the platform, is now complete and will not affect your visit. Restoration work on the western side of the Bayon is ongoing.
Bayon History
The Bayon Temple is now known to be a Buddhist temple, and was constructed in the reign of that prolific builder, Jayavarman VII, at the centre of his fortified walled city of Angkor Thom, the ancient capital city of the Angkor empire.
This was not the first temple to be built in Angkor Thom – the Baphuon Temple was built by Udayadityavarman II around the mid-11th century, about 150 years before the Bayon, and Jayavarman VII included it within the new city walls.
He built the Bayon exactly at the centre, and placed his kingdom under the protection of Buddha, whose broken statue was found in a pit below the central sanctuary. Most of the extensive bas-reliefs, devatas, and apsaras at the temple are informed by Hindu mythology, as is the temple-mountain form of the temple, so the Bayon presents a mixed religious environment.
Whose Face is it?
On the 37 towers on the upper-level cruciform platform there are 173 enigmatic, giant stone faces. These stone faces are impressive – more than double the height of a person. There used to be more. How many more is disputed, but there were originally at least 49 towers, and maybe as many as 59, with over 200 faces carved on them – each tower having either four, three, or two faces each.
Why are there giant faces at the Bayon temple? One suggestion is that the faces symbolise spiritual guardianship, continuously watching over the land and its people. The subtle smile and calmness of the faces reflect inner peace and spiritual serenity.
So whose face is it? This has also been much disputed over the years, but all experts agree that it is not the Buddha – sometimes the identity of choice on internet images.
The Chinese emissary Zhou Daguan, in the late 13th century, described them as large Buddha heads. Centuries later, the first European visitors thought the faces were of Brahma, the four-faced god of Hindu mythology. Some scholars thought the faces represented Shiva. It was also suggested that the faces depicted King Jayavarman VII, presenting himself as a god-king, but that thinking has been superseded.
When it was finally established that the Bayon was a Buddhist temple, it was generally thought that the faces on the Bayon and the Angkor Thom entry gates were of Lokeshvara, the Bodhisattva of compassion, but not all scholars accepted that the faces represented the Bodhisattva. Later, Japanese researchers identified that not all faces had male features, some were female, and that there were three different types of faces representing devas, devatas, and asuras. Lastly, another proposal was that the faces represented the Bodhisattva Vajrasattva.
We will probably never know who the faces represent – they will forever remain an enigma. As Michel Petrotchenko says about the identity of the faces in his guidebook:
The fact of the matter is that we will probably never know. The deity of the Bayon will keep on smiling, knowing that the question of its identity will forever remain a mystery. Undeterred by our speculations, the god will continue to spread its compassion and its protection over the provinces of a now defunct empire.
Petrotchenko, M (2017). Focussing on the Angkor Temples: The Guidebook, p. 217. Published by Michel Petrotchenko.
Best Times to Visit
So, when is the best time of day to visit the Bayon?
If you want to see the upper level with very few tourists, or none at all, like in the image below, you need to be there as early as possible. That image was taken around 8:00am, and although I waited for a couple of tourists to move on before taking the shot, generally, the upper level will be quite deserted at that time.

©2025 Rick Piper Photography. View a hi-res version of this image at rpphotoz.com

©2025 Rick Piper Photography. View a hi-res version of this image at rpphotoz.com
If you wait until mid-morning, though, the upper level will be crowded with tourists, as in the image to the left. Assuming you are not trying to fit in everything on a Small Tour Circuit, consider heading directly to the Bayon after seeing the sunrise at Angkor Wat, maybe eating breakfast and having a coffee or two, and be there for when it opens at 7:30am.
If you can, avoid stopping at the South Gate of Angkor Thom on the way. Maybe visit another time, because by 8:00am there are already busloads of tourists at the South Gate (image below), and their next stop is the Bayon!

©2025 Rick Piper Photography. View a hi-res version of this image at rpphotoz.com
Go to the Bayon first and have the upper level almost to yourself. Then view the bas-reliefs on the lower level, which cover a large area and will not be so crowded earlier in the morning, although they will get busier as the day progresses, as below.

©2025 Rick Piper Photography. View a hi-res version of this image at rpphotoz.com
Tourist numbers ease up a bit around lunchtime, but the lighting is not so good for photographing the faces – the sandstone faces are almost monochrome grey. I have found it a good time to photograph the bas-reliefs, though – the sun overhead creates good shadows that help accentuate the carvings. In the afternoon it gets very busy again until golden hour, when people head off to Angkor Wat, Phnom Bakheng, and Pre Rup to watch the sunset.
Golden Hour
If you want to capture a golden hour shot at the Bayon, like the one below, you need to time it right.

©2025 Rick Piper Photography. View a hi-res version of this image at rpphotoz.com
The faces in the image above are on the eastern side of the upper level, and you need to shoot from a position to the south of the central sanctuary – the same faces are on the feature image at the top of this post, but shot mid-morning under an overcast sky, so, very different light. With four faces to choose from, there are a number of different golden hour face combinations available, and there are many versions of this golden hour shot on the internet.
I had scouted out the shot in the morning, so returned in the afternoon and set myself up next to the south doorway of the central sanctuary, between the building and a square column to my right, camera pointing east to the face towers – there was just enough room for me and my tripod – and waited for the warm glow of golden hour.
The sandstone really does take on that lovely soft brown glow, but the problem with shooting in golden hour at the Bayon is the surrounding forest – in the last hour before sunset, some of those particular faces will start to have tree shadows encroaching on them. So my advice is to check the time of sunset with an app like The Photographer’s Ephemeris, get into position, and set yourself up about an hour and a half before sunset, or even earlier.
The Bayon will still be quite busy at that time, so you need to grab that slightly elevated spot by the central sanctuary as soon as possible, as there is only room for one person, and other people may be thinking to do the same. Alternatively, you can shoot at floor level on the upper level, in front of, and slightly below this position, as indicated in Petrotchenko’s guidebook to the temples, Focussing on the Angkor Temples: A Guidebook, (p. 221).
I took a series of shots every five minutes until the tree shadows got near to the faces. The image above was taken 50 minutes before sunset, so just within golden hour, but shortly after that time the shadows started to encroach on the faces.
Shooting the Faces
The other good location for shooting multiple faces, such as the image below, is in the southwest corner of the upper level platform in the morning, shooting northwest to the face towers west of the central sanctuary. In this location you can get a variety of face combinations in the shot. If you have a guide, they will know where to shoot from. If you do not have your own guide, maybe listen-in on a nearby tour group, or, if you have a copy of Michel Petrotchenko’s book, Focussing on the Angkor Temples: A Guidebook, both shooting locations are indicated on the third floor plan (p. 221).

©2025 Rick Piper Photography. View a hi-res version of this image at rpphotoz.com

©2025 Rick Piper Photography. View a hi-res version of this image at rpphotoz.com
The image to the left was taken around 7:30am, almost two hours after sunrise, and still shows a little of the morning golden hour glow. This face tower is in the western part of the upper level, and faces east.
Some of the most dramatic images of the faces are close-ups, isolating individual faces against a blue sky or a backdrop of forest greenery, as in the images below. If you are shooting for stock, it is a good idea to allow for some copy-space also. You will need a long lens, but do not worry about tourists getting in the way of your shot – you will be shooting over their heads.

©2025 Rick Piper Photography. View a hi-res version of this image at rpphotoz.com

©2025 Rick Piper Photography. View a hi-res version of this image at rpphotoz.com

©2025 Rick Piper Photography. View a hi-res version of this image at rpphotoz.com

©2025 Rick Piper Photography. View a hi-res version of this image at rpphotoz.com
Not all the faces are high up on towers. Some are at a lower level, just above the upper floor level, and consequently, very popular with tourists posing in front of them or taking selfies. If you want a tourist-free shot you may have to set yourself up, wait, and be ready to press that shutter button.

©2025 Rick Piper Photography. View a hi-res version of this image at rpphotoz.com

©2025 Rick Piper Photography. View a hi-res version of this image at rpphotoz.com

The immense size of the face can be seen by the chin in the top left of the image.
©2025 Rick Piper Photography. View a hi-res version of this image at rpphotoz.com
Some of the low-level faces are popular because they can be viewed through window openings in the vestibules, such as below. However, you may need to wait for a tourist-free shot through the window. You may also need to wait until no one is posing in the window with the face in the background – a very popular shot to post on social media.

©2025 Rick Piper Photography. View a hi-res version of this image at rpphotoz.com

©2025 Rick Piper Photography. View a hi-res version of this image at rpphotoz.com
There is usually a small troupe of dancers dressed in traditional Khmer costumes, who are willing to pose with you in front of one of the stone faces, for a price, if that appeals to you. Very popular with some tourists.

©2025 Rick Piper Photography. View a hi-res version of this image at rpphotoz.com
Access to the Upper Level
Take care getting up to the third level – there are steep, narrow, well-worn stone steps, with low headroom near the top if you are tall. Take even more care when descending those steps.
The steps in the image below left are typical of stone steps everywhere at the Angkor temples, and do not look too bad, but the image lacks a sense of scale – those risers are high, and the steps have very narrow treads. Ascending is relatively easy, if a little strenuous, but descending is definitely not at all easy – the steps look almost vertical when viewed from the top. The image below right shows someone descending those same steps, side on, and very carefully. Not for the feint-hearted, for sure!

©2025 Rick Piper Photography. View a hi-res version of this image at rpphotoz.com

Last Thoughts
Getting good shots of the faces at the Bayon Temple takes a bit of planning and time, so I hope you have found the advice above helpful. It definitely pays to plan ahead and slow down.
If you have never visited the temples at Angkor, you may find the following three posts useful as an introduction:

Historical overview and clarification

Practical advice

General advice for photographers, and resources
Camera Gear
All images in this post were shot with a variety of cameras, either:
- Using Fuji Sensia transparency film in Olympus OM1 cameras, with Zuiko lenses – transparencies were then scanned using a Nikon ED5000 film scanner and processed in Photoshop
- Or, shot in RAW using digital Nikon camera bodies, with Nikkor Pro f2.8 lenses, and then processed in Lightroom and Photoshop.
- Or, shot in RAW using digital Olympus OMD camera bodies, with Zuiko PRO f2.8 lenses, and then processed in Lightroom and Photoshop.
- Or, shot in RAW using a digital Panasonic camera body, with a Panasonic 20mm f1,8 lens, and then processed in Lightroom and Photoshop.
All images Copyright ©2025 Rick Piper Photography (unless noted otherwise). All rights reserved.
Leave a Reply